Last
year we were abroad on D's birthday so I never got to make a cake. This
year he has been so excited about his birthday (ever since Iz's in
August!!) so I wanted to make him something he'd think was cool...
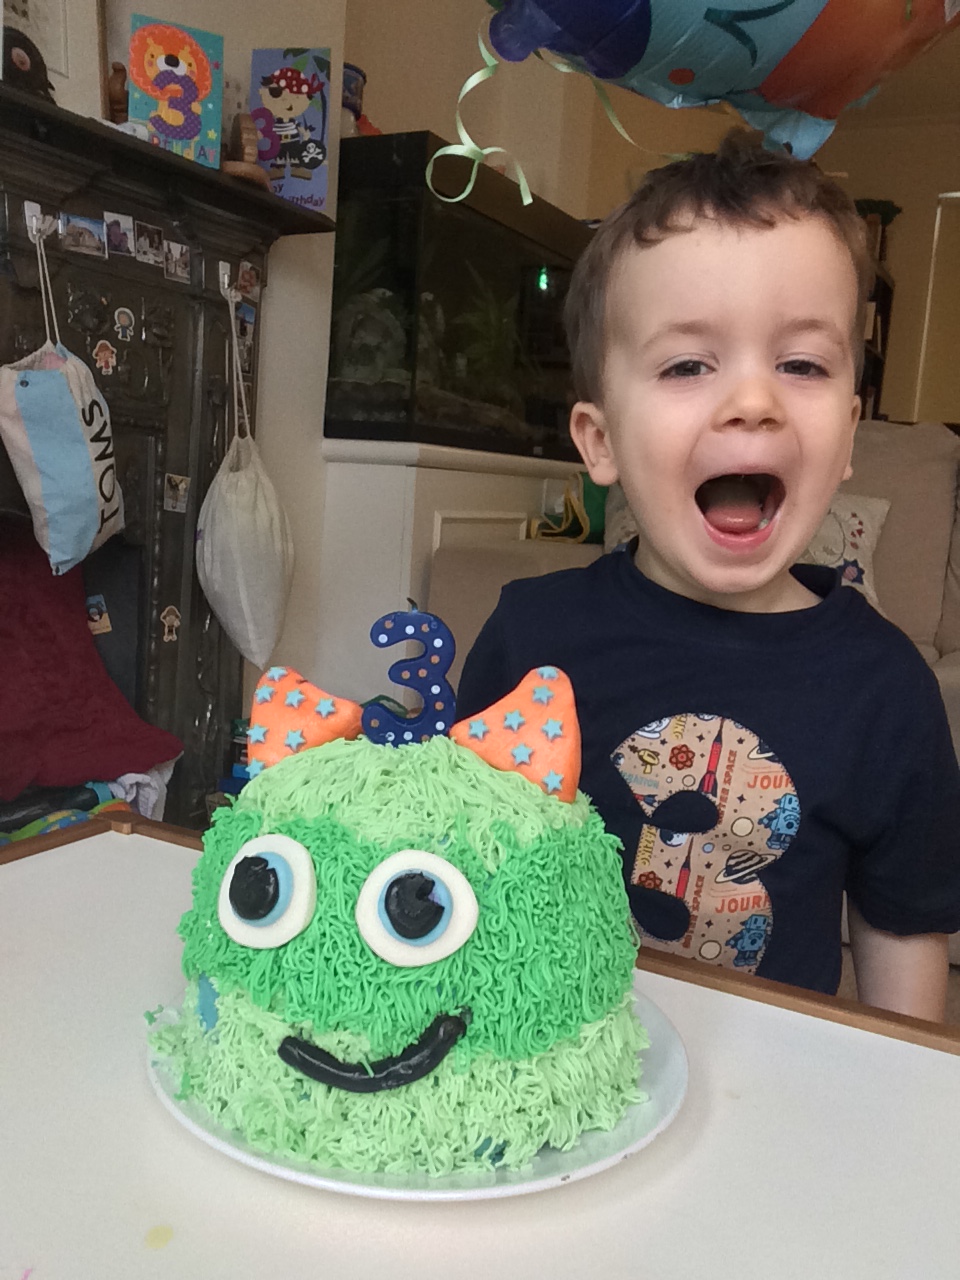
Welcome to the monster cake!

It
was actually pretty easy to make - I did the prep baking one evening
and then iced it the day before his birthday. If I can make it then
anyone can!

Cake:
What you need:
A glass bowl and cake tin (of similar sizes)
Usual ingredients for sponge cake (I used a Betty Crocker box)
Butter or greasing spray
You
can use any basic sponge recipe for the cake - I actually cheated and
used a box of Betty Crocker chocolate cake mix (sometimes you have to
cheat a little to find time for everything!!).
1. Grease the glass bowl really well and fill 2/3 with cake mix. Then fill the greased sandwich tins with the rest of the mix.
2.
Be prepared to cook for a LOT longer than normal! The glass bowl cake
took just over an hour! Keep checking with the skewer test and then
you'll know when it's ready.
3.
Once cooked take the bowl/tins out of the oven and leave for 5-10
minutes before trying to tip out. Then gently score around the edge of
the bowl with a blunt knife, tip the bowl upside down and cross your
fingers! Mine came out in one piece, but even if it hadn't I could've
still used a bit of icing to piece it back together again.
4. Leave on a rack to completely cool and then wrap in clingfilm and put them in the freezer

Icing
What you need:
250g butter
500g icing sugar
5ml vanilla essence
Food colouring (I used green and blue)
The
amount of icing you need will obviously depend on the size of your cake
so I'd advise making one batch to start with and then reassess after
that.
1. Make sure butter is at room temperature
2. Chop the butter into cubes and then mix until paler and creamy
3.
Add half the icing sugar and very slowly mix until all the sugar is
mixed in. Then increase mixer speed for 2-3 minutes. Every minute scrape
down the sides.
4.
Add the rest of the icing sugar and again mix slowly to start with and
then mix on high for a few minutes until the icing is much paler.
5. Add the vanilla essence and mix well
6.
Add the food colouring and mix well (I divided the icing in 2 and
coloured one with a little green and the other with much more green and a
tinge of blue to give a darker green shade)
The
icing is now ready to use, or you can store it in the fridge and it'll
keep for several days. Just make sure you allow it to come to nearly
room temperature before using as that will help its flexibility.
Cake assembly
What you need:
Buttercream icing (above)
Various cake pieces
Spatula
Fish slice
1. Take cakes out of freezer and unwrap carefully
2. Work out how you want to stack the cake pieces
3.
Starting with bottom layer, spread on a layer of buttercream icing (I
used a wide nozzles piping bag for ease) and then add the next layer
4. Repeat for as many layers you have
5. Once all stacked put the fish slice under the bottom layer and leave in place (you'll thank me later!)
6.
Then dirty ice (also called a crumb coat) the whole cake - this later
won't be visible once cake is finished so doesn't have to be the
nearest/tidiest but should just cover the cake. It makes subsequent
icing a lot easier and prevents cake crumbling
7. Put the whole thing (cake/fish slice/board) into the fridge and chill for minimum 30 minutes


Cake icing
What you need:
More butter cream icing
Icing bag (I used a disposable one)
Icing tip #233
There
are a million different ways to ice - my advice is try a bit on a
board/cup/whatever first to see what works for you. I started out
thinking I'd pull away from the cake and let the icing "hair" fall down
but I just couldn't make that work and so improvised a different way!
1.
Put your nozzle in place and fill the piping bag with icing
2.
Start at the bottom of the cake and slowly work your way around. I
started at the bottom, went up about 5cm and then pulled off. Then
repeated this all around the cake
3.
Once the bottom area is covered, the next step depends on if you're
doing multiple colours or not (next time I want to do a rainbow one!).
If you want more than one colour, leave a gap and then pipe another
layer. Don't worry if the cake decoration looks a bit weird - it will
come together at the end!
4.
Cut your nozzle out of the piping bag and transfer to a new bag and
fill with the other coloured buttercream. Repeat the icing in the spaces
left
5.
Once fully covered carefully transfer to a plate/platter. This is where
you'll be very glad you put the fish slice under the cake as now you
can move it without touching (and thus ruining!) the icing
6. Once safely on the plate slowly wiggle out the fish slice. It's job is done!


Fondant features
What you need:
Gum paste (white)
Food colours
Black fondant
Cake pop sticks
Pastry brush (or could use your finger!)
Cornflour - optional, I didn't actually use any
I
actually used a mix of gum paste and fondant to make his
eyes/mouth/horns. They were both at easy to work with but I think the
gym paste retained its shape much better for longer whereas after a few
days the fondant got a bit "weepy".
1. Knees the gum paste to make it easier to work with
2.
Divide into smaller pieces and colour each one with the appropriate
colour (add 1-2 drops of food colouring and knead well until well mixed)
3.
Then create whatever extra features you want for your monster. I did
eyes, a mouth, 2 big horns and a smaller central horn. I actually ended
up using a different mouth in the end as I didn't like the first one I
made!
4.
If you want to stick one piece on top of another, dip your pastry brush
in water and gently "paint" one side, then just press firmly together
5. Once they're finished push a cake pop stick into the back of each (these are great because they're blunt!)
6. Leave to dry for at least 24 hours - so make them in advance!
7. Then just slide the sticks into your cake at the desired places

All finished! I was so happy with how it turned out - and I think D was too! :)
Your monster cake looks absolutely amazing, Dr. Visha! As someone who loves baking and experimenting with new recipes, I'm always on the lookout for opportunities to enhance my skills. It's great to know that there are cake classes in Chennai that can teach me how to create such beautiful and intricate cakes. Thank you for sharing this amazing post and inspiring me to take my baking skills to the next level!
ReplyDelete